Lord of Chaos
Jump to navigation
Jump to search

| |||
|---|---|---|---|
| Location | Minos Iceworks | ||
| Briefing | I am Araghast the Pillager! Master of Hounds! The Lash of the Black Legion! You and all your kind are cowards! Lowly lickspittles! You must be emulating that pile of bones you call an Emperor! You are as dead and useless as him! I am destroying your worlds, Blood Ravens. Yet you do nothing! I see your precious craft, hanging in orbit above Aurelia. I am here. Face me if you dare! "We must destroy this braggart!" I agree, Commander. We cannot allow him to call us – and the Emperor – cowards. When we strike at this madman, there can be no falling back or tactical withdrawals. | ||
| Objectives | Defeat Araghast the Pillager Issuing a Fall Back command will cause corruption | ||
| Intelligence | Powerful armored vehicles patrol the area. Use anti-vehicle weapons. Plague Marines are in the area. They are slow, but very resilient and deadly at close range. | ||
| Notes | Angel of Death: Avitus gains corruption if he does not deploy on this mission. | ||
| Reward | Gorgon Plate (level 24 Epic Dreadnought Armor) | ||
Lord of Choas is a Chaos Rising campaign mission, followed by Raid on Calderis.
Objectives
- Primary Objective: Face Araghast
- Corruption Risk: Issuing a Fall Back command will cause corruption
- Primary Objective: Kill Araghast
- Redemption Opportunity: Secure the Shrine
Corruption/Redemption
- Order a squad to retreat (+4 Corruption for all deployed squads)
- Capture the Imperial Shrine (+2 Redemption for all deployed squads)
Achievements

For completing this mission, you receive the "The Challenge Answered" achievement for 50 ![]() .
.
Walkthrough

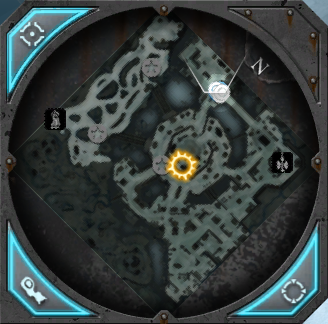
- Head to the center of the map. You will see Araghast, but he will teleport away and leave you to fight his minions. Circle around the left, and fight the large number of enemies in the way.
- Engage Araghast. He will teleport away when he reaches half health. In the cutscene, part of the terrain will collapse, providing a bridge to his location.
- The first walker appears just past the land bridge. If you're going to the shrine, you will also encounter a tank.
- When approaching Araghast, you can generally stick to one of the sides (e.g. the far edge of the map.). You can optionally kill everyone in order to secure a route in case you need to fall back.
- Kill Araghast, who has fully healed since your last engagement. When he is down to one-third health, be becomes more dangerous, using tactics unleashed from his desperation (when Eliphas backstabs him by refusing to open a portal.)